Tuesday, 29 November 2011

Bounce Light

I was checking round the internet when I came across an interesting article about lighting. Bounce lighting is where you have one spotlight at the top pointing downwards and another at the bottom pointing up. The bottom light is darker and the have a slight tint of the colour of the floor. Bounce light help to create a more realistic feel to the environment.
I made one render with out bounce light (1 Omni lights) and another with bounce light(2 spotlights ). I find the top shading for the bounce light to be a bit more realistic, although I think the bottom lights needs to be a bit brighter. I will use bounce lights as I’m going for a realistic approach to match my models, although having more lights will take a bit longer to render, but it should not take that much longer.

Friday, 25 November 2011

Week 10

This week I learnt about controlling object though attributes. This first thing I did was make a custom attribute called Turn, The Turn attribute ranges from 0 to 100 and will be the controller to rotate the 3D box.
In the reaction manager I selected the spline and chose the custom attribute Turn, so when value in Turn changes something will happen, but I need to tell the reaction manager what is going to happen.

I then made the 3D box a slave of the spline and created two states. The first state is when the Turn attribute is 0 and rotation of the X axes for the 3D model is be 0.0. The second state is when the Turn attribute is 100 and the rotation of the X axes for the 3d model is 0.360.

You can see when I change the value of the Turn attribute, the 3D box rotates on the X axes. This techniques can be useful in controlling object or multiple object more easily, A good example would be a car, you can use one object to turn both front wheels and the steering wheel just by changing a value, instead of changing each object individually.

Thursday, 24 November 2011

Princess Leia's Ship Materials

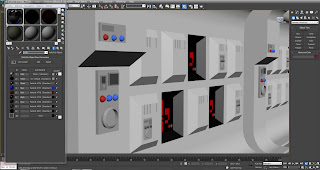
Same with the other models, I applied the material to the polygons but did some things different this time. I used a Multi/Sub object to store all the material for the walls, then changed the material ID for the selected polygons for the material I wanted. I found doing multiple materials for objects much more organise by using Multi/Sub object.

This material is a bitmap that represents a control panel on the wall. Before making the bitmap in Photoshop, I exported UVW map of the polygon where the control panel will be, so I could get the correct size, the reason I did this was because the bit map would stretch to fit the polygon, and would not be the correct size/ would look out of place.
Most of these materials are very basic and there is nothing really special about them, I will mainly talk about the important one, as I don’t want to go on and on about the same thing.


With the floor material I wanted a bit of reflection as seen in the star wars films. From test renders, that slight bit of reflecting help in noticing the light hitting the floor.

As there will be some low down camera angles, I put a dent bump map on the floor to add some detail. The bump map with the reflection creates a nice look to the scene. I find the mix of the plain walls and the dotted floor really works together.
I used a self illuminating material for the top part of the ceiling as that’s the light source, I gave the material a tint of yellow, as no lights are pure white.

Wednesday, 23 November 2011

R2D2 Material

I don’t need to create materials with a lot of detail for R2D2, as the materials will be one colour, because of that I will not be using UVW mapping. The First material is A metal/silver material, I chose to put a hint of blue in the colour so it doesn’t look completely gray but more silvery.
The plastic template in in the Architectural was exactly what I was looking for, for R2’s body. I needed to turn down the reflection as it was two strong.

Originally for the head material I wanted a stainless steal effect, and for that I need to stretch the reflection. The only problem was I need to download V-Ray to do that, and using V-ray would make the rendering time to high. There were some other method that I saw like using a black & white photo and stretching it, but I could quite understand how to do that.

For the stainless steal effect I chose to use a noise procedural map and stretch it across one of the axes.

For R2’s orange glowing eye, I set the material to Self Illumination. I did some experimenting to make the orange glow but it put the rendering time up and the glow was not really noticeable, so I dropped the idea, and just kept the Self Illumination.

Tuesday, 22 November 2011

Mouse Droid Materials

I chose to texture the mouse droid by applying materials to the polygons, the reason why I did it this way was because I wanted to use procedural maps instead of bit maps, as I could get a better looking random material for the body. The current material that is shown in the image is used for the body of the droid. I used a Smoke procedural map what is a mix of two types of grayish blue, this gave the body a stained look so it did not look bran new. I applied a bump map to the material to give the body a rough look to it. From images online Mouse droid don’t look bran new or very old, I wanted to make the droid look respectable but also make it look like it been warned out slightly over the years but been taken good care of.

With the tilling I set the Y axes to be slightly larger than the others, this will stretch the smoke to give it a metal grain look which will make it more realistic.
I chose not put a lot of detail into this material, as there will never be a close up of that part of the material, so it be pointless to put a lot of detail into it.
The next material is very or exactly the same the body material, but has slightly darker colours so it stands out slightly to the body material.
I applied a bump map to this material as there is a close up of this part of the body in one of the scenes. The bump map is used just to give the exact bit of shading to the animation on the close ups, I’m not to sure if its going to be noticeable, but I’m just adding it in case.

From a bit of research I learnt about material Ids and that they have many purposes. I found that its useful for keeping materials organised. If I had more time I would of made Two Multi/Sub object, one to keep all the body materials in, and one for the wheel materials. The Multi/Sub object for the wheel contains two materials for the wheel, the tier and rim.

The colour of the material is not 100% black as it would be to dark and unnatural, so I chose to keep the material only slightly lighter than being completely black.

For the rim material I used a Architectural, the reason for that was after experimented with some reflections I found using a architectural to be easy to get the effect I want, although it is a bit limited on what I can edit on the architectural material.

Thursday, 17 November 2011

Week 9

This week I learnt about rigging bones to objects. Once I made the bones and add a HI solver to make the bones move realistic, I my a short animation of the bones moving/bending, the next step is to rig the bones to the object.
I added a skin modifier to the object and added the bones which will control the object. When I watched the animation some of the polygons are going into each other.

I edited the envelopes what controls which bone controls which polygons, Although the polygons are not going into each other now, the object is out of shape.

To fix the shape of the object I selected a section of the polygons and added a joint angel deformer, this allows me to change the bumps to make smooth curves. I made 3 separate joint angel deformer for the 3 different joint areas.

The end result is a much smother and better looking transition when the bones move the object. By using the different tools you can simulate muscle movement what be good to make realistic character animation.

Tuesday, 8 November 2011

Week 8

This week I learnt about animation. One way of doing animation is using key frames, and moving the object to the next position. You can also use the curve editor to add shake or how much the object speeds up or slows down. Another way of doing animation is getting objects to follow an open spline. The good thing about getting an object to follow a path, is that you have the option of making the object rotate and bank while following the path. I will have some of the objects following a spline in my animation like the mouse droids, the reason for that is because the mouse droid be swerving side to side while going down the corridor, and it would be a bit more time consuming to do each frame. another good thing about using the path tool is that I could easily change the path in a matter of seconds.

Tuesday, 1 November 2011

Week 7

This week was all about cameras. There are two types of cameras, what are the free and target cameras. The first camera I used was the free camera. The free camera displays everything that falls in the boundary of the blue box coming from the camera. You can also move and rotate the camera as well to get better camera angels.
The second camera I used was the target camera. The target camera lets you fix the camera to a target, so if the target objects moves around, the camera will still be looking at the object, because the camera pivots around to keep track of the target.
You can change the FOV(filed of view) and lens sizes. Both of these can be used to zoom in, but also good for choosing how much of the scene you want to see. If there are big objects on the scene, a wider FOV/ lens would be good.
Clipping planes lets you chose when the objects are drawn There are two parts to the clipping plane, what are near and far. The near clipping planes would be good for looking into buildings. they use clipping planes also in the Sims games. The far clipping plane would be use if you don’t want any of the far objects to be drawn.